
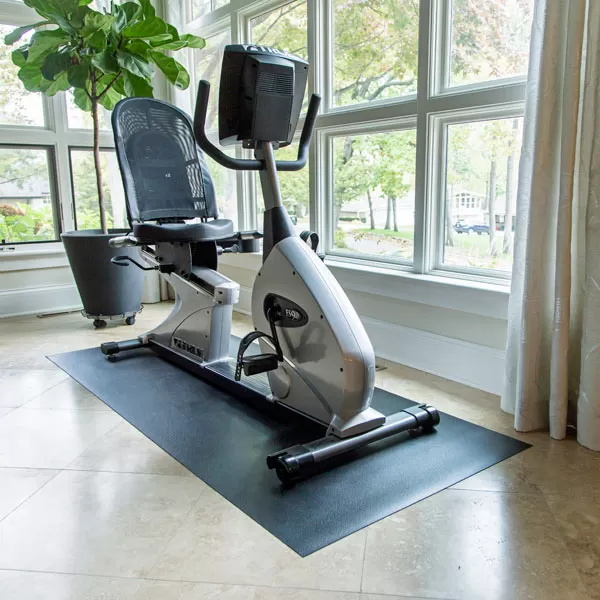
The Ultimate Home Cardio Gym Flooring Guide: Mats, Tiles & Protection
The Foundation of Your Fitness: A Complete Guide to Home Cardio Gym Flooring
You have selected the perfect stationary bike or treadmill. You have planned your space and budget following a strategic guide. Now, you face a critical, often overlooked step: what goes underneath your equipment? The wrong flooring choice can lead to permanent floor damage, excessive noise, and even equipment failure. Proper gym flooring is not a decorative afterthought; it is a functional necessity that protects your investment and your home. This guide provides a complete analysis of mats, tiles, and protection systems specifically for home cardio equipment, helping you choose a solution that safeguards your floors, reduces vibration, and creates a durable foundation for every workout.
Selecting home cardio gym flooring requires matching the product’s protective capacity to your equipment’s weight, impact, and vibration. The primary options are rubber mats, interlocking tiles, and rolled rubber. High-density rubber mats over ½ inch thick are ideal for heavy treadmills and ellipticals, while interlocking tiles offer versatility for irregular spaces. Rolled rubber provides a seamless look for larger areas. Beyond material, you must consider thickness for load distribution, density for shock absorption, and surface texture for stability. Correct installation is equally vital to prevent shifting and ensure long-term performance. This decision directly impacts your equipment’s lifespan and your home’s integrity.
Why Your Flooring Choice Matters More Than You Think
Cardio equipment imposes unique stresses on a floor. A treadmill in use combines significant static weight with dynamic impact from running. An elliptical or stair climber creates a rocking, rhythmic force. A stationary bike, while generally stable, transmits subtle but persistent vibration through its frame. Over months and years, these forces can cause real damage. Hardwood floors can become permanently dented or scratched. Laminate or engineered flooring may warp or separate at the seams. Even concrete slabs are not immune; vibration can transfer through the structure, becoming a noise nuisance for rooms below.
The consequences extend beyond cosmetic issues. An unstable floor surface can cause equipment to wobble or shift during use, compromising your safety and the machine’s calibration. Excessive vibration accelerates wear on the equipment’s internal bearings and motors, leading to premature repairs. This makes your flooring a key component of a holistic home gym setup, as critical to longevity as the regular maintenance outlined in equipment-specific guides. The right flooring mitigates these risks by performing three essential functions: distributing weight over a larger area, absorbing shock and vibration, and providing a non-slip, level surface.
Decoding Flooring Materials: Rubber, Foam, and Hybrids
The market offers several material types, each with distinct properties. Understanding these differences is the first step toward an informed choice.
Rubber: This is the gold standard for home gym flooring due to its durability, density, and shock-absorption qualities. It is typically made from recycled or virgin rubber and comes in various thicknesses and textures. Rubber is exceptionally durable, resistant to tearing, and provides excellent vibration dampening. Its high density means it will not compress permanently under heavy loads. The natural grip of rubber also prevents equipment from sliding. The main drawback is weight; thick rubber mats are heavy and difficult to move. Some lower-quality rubber can have a strong odor initially, though this dissipates.
Foam (EVA): Foam tiles, often made from ethylene-vinyl acetate (EVA), are lightweight, inexpensive, and easy to install. They provide good cushioning for bodyweight exercises or light equipment. Still, for substantial cardio machines, foam is generally inadequate. It lacks the density to properly support concentrated weight, leading to permanent compression and an unstable base. Foam also offers minimal vibration dampening for heavy-duty equipment. Its primary role in a cardio space is as a top layer for comfort in stretching areas, not as primary equipment protection.
Hybrid/Cork Composites: Some modern flooring options blend rubber with other materials like cork. These composites aim to offer the durability of rubber with enhanced acoustic insulation and a more aesthetic finish. Cork is a natural vibration dampener and provides a warmer, softer feel underfoot. These products can be excellent for reducing noise transmission, a complementary consideration to dedicated soundproofing strategies. They are often priced at a premium and may not be as universally durable as pure, high-density rubber for the heaviest loads.
Critical Specifications: Thickness, Density, and Surface
Choosing a material is only part of the equation. You must evaluate key physical specifications that determine performance.
Thickness: This is the most visible specification, typically ranging from ¼ inch to ¾ inch for home use. Thickness directly influences weight distribution and cushioning.
¼ inch: Suitable for lighter equipment like spin bikes or under light free weights. May not be sufficient for a heavy treadmill.
½ inch: The most versatile choice for home cardio gyms. Adequate for most treadmills, ellipticals, and rowers. Provides good protection for standard hardwood or concrete subfloors.
¾ inch: Recommended for the heaviest commercial-grade equipment, intense impact, or if you have significant concerns about noise transmission to lower floors. It offers maximum shock absorption.
Density: Often overlooked, density is as important as thickness. Density, measured in pounds per cubic foot (PCF), indicates how much material is packed into the space. A high-density ½-inch mat (e.g., 90 PCF) will resist compression and provide better support than a low-density ¾-inch mat. High-density rubber maintains its shape and protective qualities for years. Always check product specifications for density ratings when comparing options.
Surface Texture: The top finish affects traction and cleanliness.
Ribbed/Studded: Provides excellent grip for equipment feet and shoes. Channels allow airflow and make cleaning easier.
Smooth: Offers a more uniform look and is easier to roll equipment across. Can be slippery when wet.
Porous/Natural: Mimics the look of stall mats; very grippy but can be more difficult to clean thoroughly.
Product Types: Mats, Tiles, and Rolls
Flooring products come in three main form factors, each suited to different scenarios.
Interlocking Tiles: These are square tiles, usually 24”x24”, that connect via puzzle-piece edges. Their advantage is modularity. You can cover any shape of room, easily replace a single damaged tile, and reconfigure the layout. They are ideal for covering an entire room or creating a precise platform. High-quality rubber interlocking tiles are a top choice for a dedicated cardio space. Ensure the interlock mechanism is robust to prevent separation under load.
Rolled Rubber: Sold in large rolls (typically 4 feet wide and up to 50 feet long), this option creates a seamless, professional appearance. It is excellent for larger, rectangular areas. Installation is more involved, often requiring adhesive or heavy-duty double-sided tape at the seams and perimeter. The lack of seams makes cleaning easier and eliminates any risk of tiles shifting. Cutting rolled rubber to fit complex room shapes requires more skill and tools.
Exercise Mats: These are large, single-piece mats, commonly 4’x6’, 4’x8’, or 3’x6’. They are a straightforward solution for placing under a single piece of equipment. The classic “stall mat” from farm supply stores is a thick, durable rubber mat that is highly cost-effective. Ensure the mat size extends well beyond the equipment’s footprint to catch any sweat, water bottles, or dropped items. A common mistake is using a mat that is too small, concentrating all force right at the edge of the mat and defeating its purpose.
Comparison of Primary Home Cardio Flooring Types
| Feature | Interlocking Rubber Tiles | Rolled Rubber | Large Rubber Mats (e.g., Stall Mats) |
|---|---|---|---|
| Best For | Full-room coverage, irregular spaces, DIY flexibility | Large, rectangular rooms, seamless professional look | Single-equipment placement, budget-conscious setups |
| Installation | Easy, modular, no-tools often possible | Moderate, may require adhesive/tape & trimming | Simple, just place it |
| Customization | High (easy to cut tiles) | Low (difficult to cut/install in complex shapes) | Low (pre-cut sizes only) |
| Seams | Visible grid of seams | Few or no seams | No seams on the mat itself |
| Portability | Good (disassemble and move) | Poor (heavy, awkward rolls) | Poor (very heavy, cumbersome) |
| Relative Cost | Medium to High | Medium to High | Low to Medium |
Matching Flooring to Your Cardio Equipment
Different machines have different requirements. A one-size-fits-all approach may leave you under-protected.
Treadmills: These are the most demanding. A heavy motorized treadmill can weigh over 300 pounds, and a user’s running creates repetitive impact. You need flooring that combines high load capacity with superior shock absorption. A minimum of ½-inch high-density rubber is advised. The platform should extend at least 12-18 inches beyond all sides of the treadmill. This catches vibrations and provides a safe dismount zone. For upstairs installations, consider a ¾-inch thickness paired with a dedicated vibration-dampening treadmill mat for added insurance.
Ellipticals and Stair Climbers: These machines create an orbital or vertical rocking motion. The primary concern is stabilizing the base to prevent “walking” and absorbing the rhythmic force. Interlocking tiles or a large mat that fully contains the machine’s footprint work well. The flooring must have a high-traction surface to prevent the machine’s feet from creeping. A ½-inch rubber solution is typically sufficient.
Stationary and Spin Bikes: While not as heavy, bikes transmit high-frequency vibration through their rigid frames. This can buzz through the floor and become annoying, especially in multi-unit dwellings. A thick rubber mat under the bike absorbs this vibration and protects the floor from sweat and shoe scuffs. Since the footprint is small, a dedicated 3’x5’ or 4’x6’ bike mat is a perfect, cost-effective solution. It also defines your workout space neatly.
Rowing Machines: The dynamic, sliding motion of a rower places unique demands. The machine must remain perfectly level and stable throughout the stroke cycle. A seamless or tightly locked flooring surface is critical; any lip or raised edge can disrupt the machine’s track or cause instability. A large, single rubber mat or a section of tightly installed interlocking tiles is ideal. Ensure the entire rail length and your seating area are covered.
Installation Essentials: Doing It Right the First Time
Proper installation ensures your flooring performs as intended. A poorly installed floor can shift, buckle, or create tripping hazards.
Subfloor Preparation: The floor beneath must be clean, dry, and level. Sweep and vacuum thoroughly. For concrete, check for major cracks or unevenness. Any significant deviation can cause voids under your flooring, leading to compression points and potential failure. On hardwood or laminate, ensure there is no existing water damage or weakness.
Layout and Planning: For tiles, dry-fit the entire layout before making any permanent cuts. Start from the center of the room or the primary equipment location and work outward. Use a utility knife and a straight edge for clean cuts. For rolled rubber, allow the material to acclimate to room temperature for 24 hours before installation to relax any curls or bends.
Securing the Flooring:
Floating Installation: Interlocking tiles and mats are often laid as a “floating” floor, held in place by their own weight and friction. This is acceptable for most home applications. Use perimeter wall molding to hold edges down and create a finished look.
Adhesive Installation: For rolled rubber or to prevent any movement in a high-traffic area, a manufacturer-recommended flooring adhesive or double-sided carpet tape can be used. Apply only at the perimeter and seams. Avoid gluing the entire underside, as this can trap moisture and make future removal a nightmare.
Seam Management: If using multiple mats or rolls side-by-side, align seams tightly. For high-traffic or equipment areas, use seam tape designed for rubber flooring on the underside to prevent separation.
Common Pitfalls and How to Avoid Them
Learning from others’ mistakes can save you money and frustration.
Mistake 1: Choosing Thickness Over Density. A thick, spongy foam mat will compress completely under a treadmill, offering no real protection. Always prioritize high-density material for weight support.
Solution: Look for rubber products with a stated density. If unsure, read reviews focusing on heavy equipment use.
Mistake 2: Inadequate Coverage. Placing a small mat just under the equipment’s feet focuses pressure at the mat’s edge, potentially damaging the floor at that exact point.
Solution: Your flooring should be a minimum of 6 inches wider and longer than the equipment’s base. Larger is almost always better.
Mistake 3: Ignoring the Subfloor. Placing heavy rubber tiles directly on old, uneven hardwood can telegraph imperfections upward and cause an unstable base.
Solution: For slightly uneven floors, consider an underlayment product designed to smooth minor imperfections before installing your primary flooring.
Mistake 4: Neglecting Maintenance. Rubber flooring can accumulate sweat, dust, and dirt, which can degrade the material and create odors.
Solution: Clean regularly with a mild pH-neutral cleaner and a damp mop. Avoid harsh chemicals, oils, or bleach, which can break down the rubber.
Integrating Flooring into Your Overall Gym Plan
Your flooring is one component of a functional home gym. It should be planned in conjunction with other elements. For instance, your flooring strategy should align with any soundproofing efforts you undertake; a thick rubber base layer is a first line of defense against impact noise. Similarly, the ease of cleaning your flooring affects the long-term upkeep of your space, which supports the sustained use of your equipment. When you follow a comprehensive home cardio gym setup guide, flooring is the critical final layer that brings the plan together, ensuring the space is not only functional but also permanent and protected.
Think of your flooring as the silent partner to your equipment. A well-chosen floor protects the investment you made in selecting the right machine, whether from a detailed stationary bike buyer’s guide or a broader cardio equipment comparison. It preserves the resale value of your gear and your home. It turns a room into a dedicated, professional-grade training environment. By investing in the foundation, you ensure everything built upon it lasts for years of productive, safe workouts.
Frequently Asked Questions
What is the best type of flooring to put under a treadmill?
A high-density rubber mat at least ½ inch thick is the best choice. Ensure the mat extends well beyond the treadmill’s footprint in all directions to effectively absorb vibration and impact. For very heavy models or upstairs installations, consider a ¾-inch thickness.
Can I use puzzle foam mats for my elliptical or stationary bike?
It is not recommended. EVA foam mats lack the density to properly support the concentrated weight of cardio equipment. They will compress permanently, creating an unstable and unsafe base. Use rubber mats or tiles designed for gym equipment.
How do I stop my gym flooring from smelling like rubber?
New rubber flooring often has a temporary odor. To accelerate off-gassing, unroll or lay out the flooring in a well-ventilated area like a garage for several days before installation. Washing with a mild soap and water solution can also help. The smell will dissipate completely over a few weeks.
Do I need to glue down my rubber gym tiles?
For most home cardio applications, gluing is not necessary. High-quality interlocking tiles, when installed tightly over a clean subfloor, will stay in place due to their weight and friction. Gluing can be beneficial for high-traffic commercial settings or if you need to prevent any possible seam separation.
Can gym flooring damage my hardwood floors?
Properly selected and installed gym flooring protects hardwood. The risk comes from moisture trapping or using inappropriate materials. Ensure your rubber flooring is breathable or use a vapor barrier if recommended. Avoid vinyl or plastic-backed mats that can trap condensation and lead to wood warping or mold.
Conclusion
Your home cardio gym represents a commitment to your health and a significant financial investment. Protecting that investment requires a foundation built for purpose. The right flooring solution—whether thick rubber mats, interlocking tiles, or a seamless roll—serves as the essential barrier between dynamic, heavy equipment and your home’s structure. It ensures safety, reduces noise, and prolongs the life of both your machine and your floor. By applying the principles outlined here—prioritizing density and thickness, ensuring complete coverage, and installing with care—you transform a simple room into a durable, professional-grade fitness space. This final step completes the vision laid out in your overall home cardio gym setup plan, allowing you to focus entirely on your workout, confident that everything underneath is secure, stable, and built to last.
References
– The American Council on Exercise (ACE) Fitness
– Consumer Reports: Home Gym Equipment
– National Wood Flooring Association: Care & Maintenance
– Rubber Manufacturers Association